Electronic File Submission
File Submission Guidelines
Taylor Communications welcomes submission of electronic design files for your orders. We accept files in native (original) format from all commercially available desktop design software in both PC and Mac formats as well as Adobe Acrobat PDFs.
Taylor Communications utilizes a PDF workflow and we will convert native files to PDF when received. It is critical to supply us the native file and all supporting files including fonts and images.
Many customers choose to submit Adobe Acrobat PDFs instead of native files. This is preferred. However, not all PDFs are print production quality. To provide the best output, we recommend creating PDFs using Acrobat Distiller and our production job options. See below for job options and Distiller installation instructions.
PDF File Preparation
For assistance with PDF file creation, your Taylor Communications contact is ready to help!
Document Size
- Manufacturing marks of any kind are not necessary on PDF files; Taylor Communications will add them. Instead make sure the production PDF reflects the finished size of the document.
- If bleeds are required, include them in the size of the PDF. The PDF will be cropped down to the finished size in Acrobat.
Bleed
- If ink objects extend to the edge of the document page, this indicates a bleed is needed. Extend the objects 1/8" beyond the edge of the page border.
- Include the bleed in the PDF size when needed. Crop the bleed in Acrobat to show the finished size of the sheet.
- Carefully consider bleeds because they increase cost and production time. If bleeds are not desired, there should be a minimum of 1/8" clear margin on all four sides of the page. A 1/4" margin is preferred if possible.
Imposition
- If the document will be printed duplex (front and back of the sheet), make sure the PDF file has an even number of pages with blank sheets inserted in the correct position.
- For brochures, place all the panels for one side of the sheet on one page in the PDF.
- Properly impose saddle-stitched books (the number of single pages must be divisible by four). The single page PDF can be imposed into printer spreads.
- Create single pages for other books (comb, spiral, tape, perfect bound, etc.).
Security
- Do not apply security features to files.
Colors
- For best results, set colors as Pantone Solid Coated spot colors (if the software allows).
- Specify all branded or critical colors as Pantone Solid Coated spot colors.
- Colors do not have to be converted to CMYK. Our production software can do this.
Lines
- Minimum line weight is 0.3 point.
Fonts
- It is best practice is to use the same font unless there is something that needs to stand out.
- The minimum type size for positive text is 2 points.
- The minimum type size for reverse text is 3 points.
- The minimum type size for positive tinted text is 4 points.
- The minimum type size for reverse text in a tint is 6 points.
- San serif fonts are recommended for small text.
- Avoid Wingding and Webdings fonts. Other fonts such as Symbol, Zapf Dingbats BT and Commercial Pi are acceptable.
- Embed all fonts in the PDF. This does not use a significant amount of file space.
Images
- Ensure raster images have a minimum resolution of 300 DPI.
- It is best practice to edit, rotate, crop and size raster images in an image software application in order to maintain quality and reduce processing time.
- Do not scale raster images up in size because this will degrade their quality and they will not print well.
- Vector Images with fonts should have the fonts converted to outlines in order to avoid font issues.
- Be careful about using images that are copied or saved from the Web. These images are usually low resolution and may violate someone's copyright.
Tints
- Design with smaller areas when using tints and/or design with colors that are less than 40% or greater than 70% in value.
- Color variations may be reduced by introducing a texture or by adding text or graphic objects in the tinted area.
- When selecting the color for fine rules or other elements, better results will be achieved by choosing saturated colors or setting at least one separation (other than yellow) to 100%.
Gradients
- To ensure enough gray levels, the length of a gradient should be less than 7.5".
- Adding Noise or a Gaussian blur can improve gradients in Photoshop.
- Avoid creating gradients that blend from a very dark color to white. Set the color to 0% instead of using white.
Transparency
- Use spot colors sparingly in transparency effects. When spot colors touch CMYK objects with transparency best practice is to make sure they are on top of the stacking order.
- Avoid transparency designs that contain both RGB and CMYK content.
- Export to PDF and always select [High Resolution] for the Transparency Flattener.
Job Options
- Create PDFs with Acrobat Distiller (do not use PDF Writer or save as a PDF).
- Use Taylor Communication's distiller settings. This will ensure proper embedding of fonts and images. Also, the print resolution will be optimized.
Distiller Installation Instructions
Install Taylor Communication's Distiller Settings
These settings apply to offset (press printed) or digital (laser printed) products. If you are part of Taylor Communication's DesignOnDemand (DOD) program, different settings are available from your local account team.
Acrobat 4 and 5 Instructions
- Copy the "SR_Production.joboptions" file to the folder: C:\Program Files\Adobe\Acrobat 5.0\Distillr\Settings
(replace '5' with '4' depending on the version of Acrobat) - Copy the "prologue.ps" file to the folder: C:\Program Files\Adobe\Acrobat 5.0\Distillr\Data
Acrobat 6 and 7 Instructions
- Copy the "SR_Production.joboptions" file to the desktop.
- Copy the "prologue.ps" file to folder: C:\Documents and Settings\All Users\Shared Documents\Adobe PDF 6.0\Data
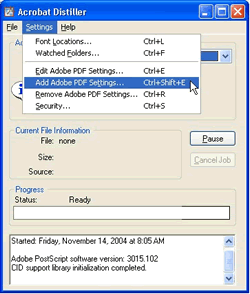
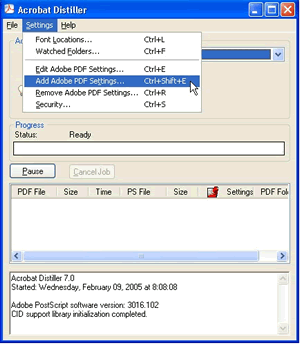
(remove '6.0' for Acrobat 7) and you will need to start Distiller and choose the Add Adobe PDF Settings option (see below) to add the job options.
 Acrobat Distiller 6 |
 Acrobat Distiller 7 |
Mac Instructions
- The "SR_Production.joboptions" file goes in the "Adobe Acrobat 5/Distiller/Settings" folder.
- The prologue.ps files go in HD:/Adobe Acrobat 5/Distiller/Data.
